 ELXR
Start with Clip
Musician manual
Written for Clip 1.0.
Clip is a compact oversampled clipper for Ableton Live with Max for Live. Use it to control peaks, reshape transients or push a sound into distortion. Everything the device needs is inside its .amxd file: drop it on an audio track or after an instrument and play.
Open full-size illustration
Start with a loop
- Put Clip after an instrument or on a playing audio track. Begin at a comfortable monitoring level.
- The starting preset is Punchy Drums: Classic, In Gain +6 dB, Soft 20%, Ceiling -0.1 dB, Quality 4x and Mix 100%. Auto Gain and Guard start on; True Peak starts off.
- Raise or lower In Gain while listening to attack and sustain. More drive sends more of the waveform into clipping. Set Soft to 0% to hear the hard corner.
- Compare at a similar listening level with Out. Let Auto Gain settle after changes; it does not guarantee equal perceived loudness.
Find the controls
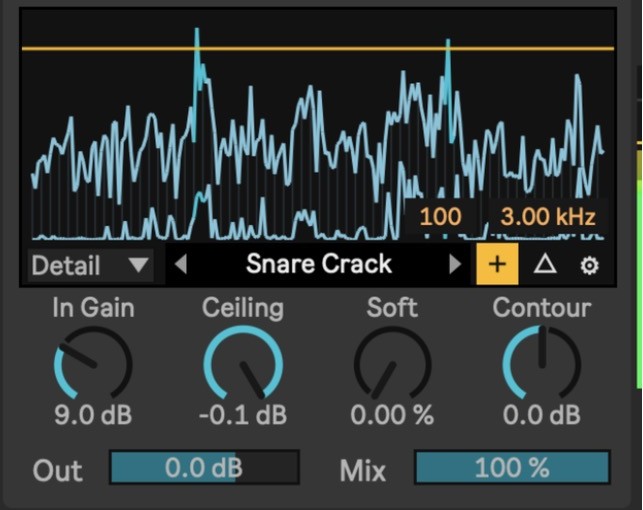
Mode, the preset bar, the Delta triangle and the Settings gear share one row at the bottom of the display. Yellow marks from the top show how far the input goes over the Ceiling. In Detail mode the amount and frequency appear in the bottom-right corner of the picture, and a small + between the preset bar and the Delta triangle hides or shows them. The preset bar keeps its size and arrows in every mode. In Gain, Ceiling, Soft and Contour shape the sound; Out and Mix set level and blend. Click a value to type it, or drag the yellow Ceiling line.
Choose how peaks change
Classic, Fold and Detail
Classic: start with the corner
At Soft 0%, Classic hard-clips at the selected Ceiling. Raising Soft rounds the transition, reaching a tanh-shaped curve at 100%. Soft changes the corner; Ceiling remains the threshold reference. Use In Gain to decide how much material reaches that corner.
Fold: reshape the overshoot
Fold turns overshoot back below the clip level rather than flattening it. This can create a pronounced change in tone as you push In Gain. Soft rounds the folded corners. Start gently and compare at a similar level; Fold is a sound choice, not a transparent peak-reduction promise.
Detail: return part of the residual
Detail starts with Classic clipping, takes the removed difference, high-pass filters that residual and adds back a selected amount. Try it when clipping changes a drum's crack or fine texture more than you want.
- Amount: 0 to 100%, default 100%. At 0%, there is no restoration contribution after smoothing settles. At 100%, the restoration path is fully applied; the original transient is not necessarily recovered exactly.
- Frequency: 500 Hz to 12 kHz, default 3 kHz. This sets the restoration crossover, not an EQ for the entire output. Lower settings let more residual return.
- Switching to Detail shows both values in the bottom-right corner of the picture. Drag or type them. The small + beside the preset bar hides them (and shows them again); they stay hidden until you next switch into Detail.
Detail can exceed the Ceiling at the clipping stage even with Guard on. The later smooth Guard reduces those returned peaks. With Guard off, Detail can go well above the Ceiling at high In Gain; that is the design, not a fault, so watch a downstream meter. Listen to texture and level together; a brighter contour does not prove an improvement.
Contour: choose what clips first
Contour: -12 to +12 dB, default 0 dB. A shelf around 500 Hz shapes the signal before clipping, with an inverse shelf afterward. Positive values emphasize highs into the clipper; negative values favor lows. The inverse stage restores the linear tonal balance, but clipping is nonlinear, so the resulting texture changes. At 0 dB the emphasis is neutral. Try positive values on harsh cymbals or negative values on kick and bass, then compare by ear.
Read the display
A view of the clipping stage
Both polarities fold upward: height is magnitude, not the positive half of a waveform. History scrolls right to left. The display stores min/max envelopes over short windows; it is not a spectrum, bipolar scope or calibrated final-output meter.
In Classic and Fold, blue shows the clip-stage envelope and is visually capped at the yellow Ceiling line. Yellow marks descending from the top show driven peaks above threshold on a compressed scale; they do not share the blue trace's amplitude scale.
There is no numeric over-threshold readout. The yellow marks show driven peaks above the Ceiling; they are not a final-output or gain-reduction meter. Settings hover labels appear at the top-left of the display.
Compare Detail with Classic
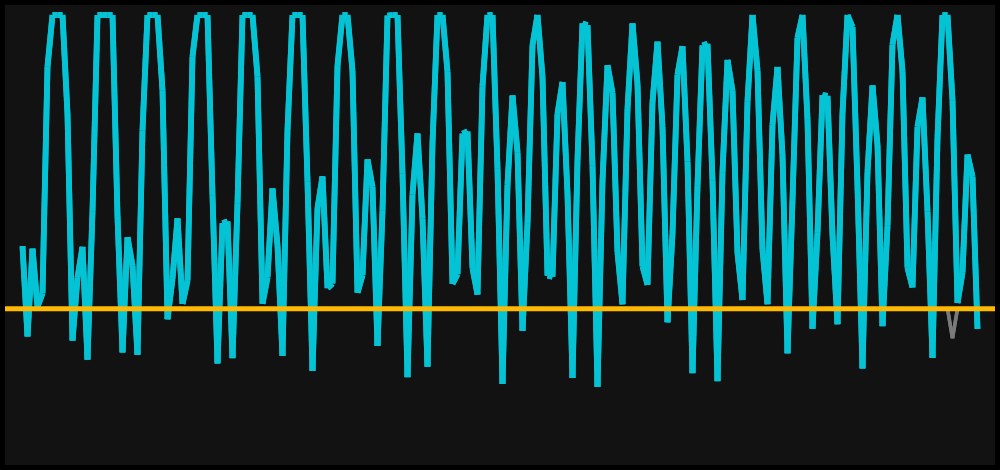
A dashed gray trace is the Classic reference; the bright connected trace is the Detail clip-stage envelope. Cyan can highlight their difference. Detail can extend above the yellow threshold with Guard on or off. At the graph's upper boundary the drawing clamps to the top edge. This is a display limit, not evidence that the audio folds back at that height.
Open full-size illustration
The data is taken before Mix, downsampling, inverse Contour, Auto Gain, final Guard, True Peak and Out. The envelope combines absolute peaks from both stereo channels; it does not show each channel separately. Fine oscillations can disappear inside a display column. Read the picture as a clipping-stage comparison and use a downstream meter for output peaks.
Move the threshold
Drag the yellow Ceiling line vertically. Hold Shift for finer movement; double-click resets to -0.1 dB. The Ceiling knob edits the same -60 to 0 dB range. Very low thresholds can sit close to the plot baseline. Zoom changes the visible time window, not the audio or threshold.
Control level and monitoring
In Gain, Ceiling, Out, Mix and Delta
In Gain: 0 to +100 dB. This boosts the signal into clipping. The wide range allows extreme effects; increase it gradually at a sensible monitoring level.
Ceiling: -60 to 0 dB. This is the clipping threshold, not an unconditional final-output limit. Restoration, rate conversion, the dry blend and later stages all matter.
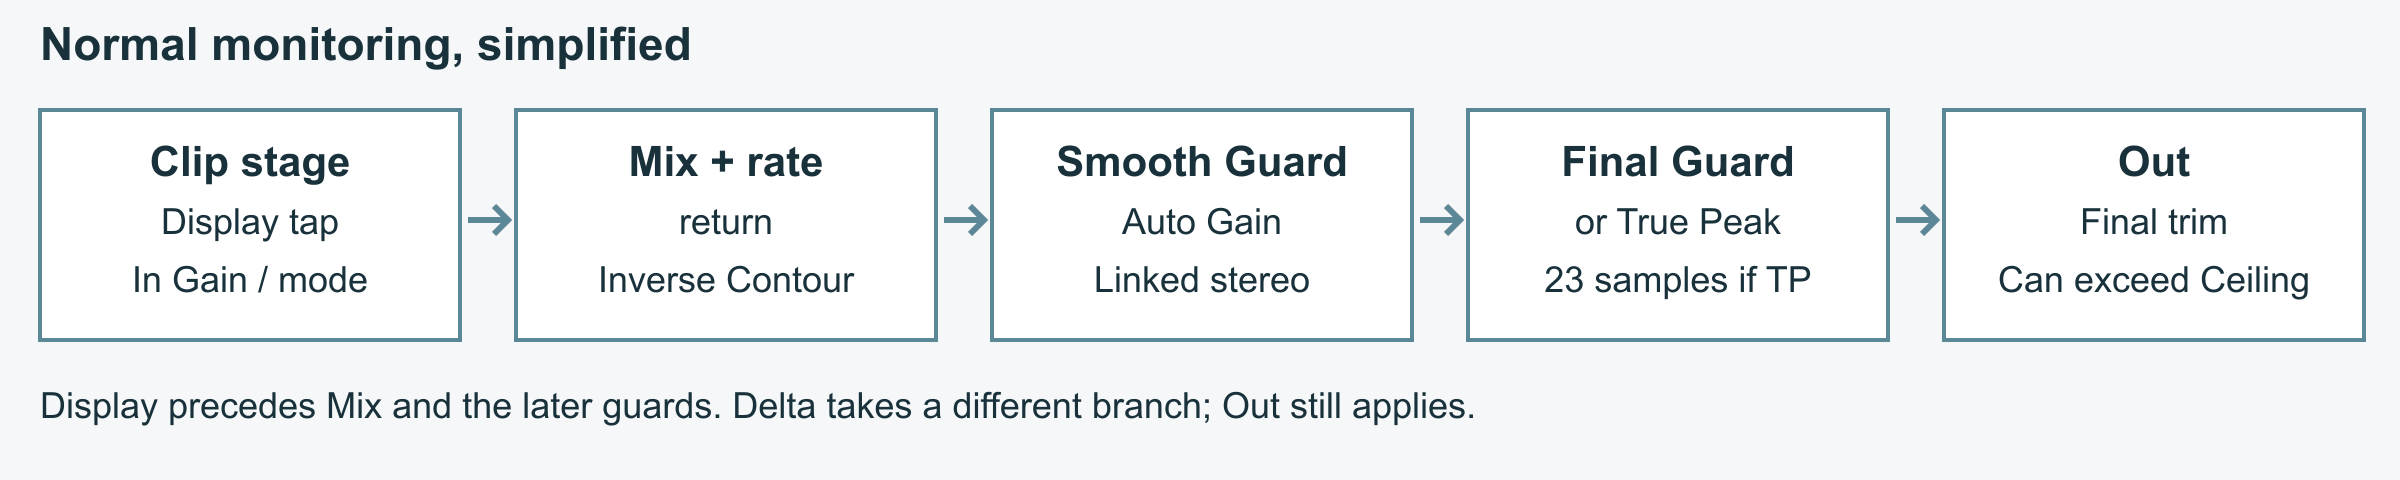
Out: -24 to +12 dB. This trim follows all peak guards, including True Peak. Positive Out can raise sample and inter-sample peaks above the Ceiling even with both switches on. Check the actual output with Live's meters or a suitable downstream meter.
Open full-size illustration
Mix is a blend
Mix: 0 to 100%. At 100%, select the processed signal. Lower values blend in the input at the clipping path. Both parts still pass through the shared rate return, inverse Contour, Auto Gain, Guard and Out. Guard can affect the dry blend. Mix at 0% therefore does not bypass the device; use Live's activator and level matching for an unprocessed comparison.
Delta: listen to the residual
The triangle selects the difference between driven input and the selected clip-stage result, scaled back by In Gain. Restoration and clip-stage processing affect that difference; Mix is bypassed. The path still undergoes rate return and inverse Contour.
Once switching settles, Delta bypasses Auto Gain compensation and the later sample and true-peak gain protection. Out still applies. Delta is not an exact subtraction of the original input from the complete device output, and the display stays a clipping-stage view. Turn Delta off before judging the normal sound.
Use Settings deliberately
Quality, stereo, matching and peak control
Click the gear to show Settings; click again to close. The ELXR menu offers Website, Manual, Feature request and Report a bug, in that order. Settings also holds colors and waveform Zoom.
Quality: 1x, 2x, 4x and 8x
The default is 4x. Higher factors clip at a higher sample rate and filter the result back, which reduces aliasing: on a bright tone driven hard, 1x leaves about -31 dB, 2x -45 dB, 4x -58 dB and 8x -71 dB. 1x is the deliberate crunchy choice. Compare at a similar level.
A new rate warms up for 20 ms, then the audio crossfades over 10 ms. Higher Quality costs more CPU. The filters are minimum-phase and add only 3 to 5 samples (under 0.1 ms) at 2x to 8x, which Live does not compensate; a dry copy on a parallel track can comb the top end slightly, so use 1x or Mix for parallel blends if that matters.
Stereo: L/R or M/S
L/R processes the two channels. M/S clips mid and side separately, then decodes to stereo. It changes how centered and wide material reaches the nonlinear stage. Check width and mono compatibility by listening.
Auto Gain and Guard
Auto Gain starts on. It compares stereo-average input and processed RMS, applying common compensation before the final peak control and Out. Let it settle after a change. It is a comparison aid, not a perceived-loudness guarantee.
Guard starts on. After rate return and inverse Contour, a stereo-linked peak gain uses immediate attack and 100 ms release. Another linked stage protects after Auto Gain. Safety clamps remain; Classic and Fold also have clipping-stage clamps. Detail restoration avoids that clipping-stage re-clip and meets the later smooth gain instead. Guard can reduce Detail peaks and the dry blend. With True Peak off it controls sample peaks, not inter-sample peaks.
True Peak
True Peak starts off and works with Guard on. It selects a look-ahead peak-control path that also catches peaks between samples, holding them within a few hundredths of a dB of the Ceiling. It adds 23 samples of delay (0.5 ms at 48 kHz), and the device reports that delay to Live so your tracks stay aligned. Switching dips the output down and back over about 4 ms each way. True Peak is inactive with Guard off, and Delta bypasses its protection. Out follows it, so meter the final output after any positive trim.
Zoom: 10 to 400 ms, default 40 ms. Color rows have a square swatch and a picker; a small x resets a changed row. Colors and Zoom affect the view, not the audio. Save device state for recall.
Listen, compare and save
Starting points and help
Tame a few drum peaks
Begin with Punchy Drums and move In Gain in small steps. Compare the attack with the original at a similar level. If hits become too flat, reduce drive or change Soft. The yellow marks are information, not a target. Init offers Classic, In Gain 0 dB, Soft 0%, neutral Contour and 4x.
Explore Detail with a reference
Switch Classic and Detail on the same loop. Begin with 100% and 3 kHz, then lower the amount to hear its contribution. Start with Guard on. If you turn it off to hear more restoration, watch a downstream meter and adjust Out. Lower Detail frequency returns more of the residual, so level can change too.
Try the factory presets
There are 18 presets in Drums, Bass, Mix & Master, Creative and Utility folders. Click the name to open the list, rest the pointer on a folder and choose a preset. The side arrows step through the presets in list order, folder by folder, in every mode. After clicking the bar, Up and Down also step while its key focus is armed; another control or 20 seconds of inactivity returns the keys to Live. The bar keeps the preset name when you edit its settings. A Set saved with an older Clip that had no preset bar opens with your own settings and reads Custom; click Custom to open Drums with no preset selected, or use the arrows to reach the first or last preset.
Presets change Mode, Quality, Stereo, In Gain, Ceiling, Soft, Detail, Contour, Out and Mix. They leave Guard, Auto Gain, True Peak, Delta, colors and Zoom as you set them. Save the Live Set or a device preset to recall the complete state.
Live can undo or redo the preset name and its controls in two steps. If you chose 808 Grit from Custom, the bar may return to Custom while the controls still match 808 Grit. In that case, Values match 808 Grit appears below the waveform when Settings is closed. The bar shows the stored selection. Use Live’s Edit menu to check the next Undo or Redo.
If something seems wrong
- The graph is capped but the output is higher: the drawing shows an earlier stage. Check Out, Guard, True Peak and a downstream meter.
- The result sounds louder: let Auto Gain settle, then compare with Out.
- Delta is quiet or unusual: it monitors the residual. Turn it off for normal listening.
- A preset did not change Guard or True Peak: protection and monitoring switches deliberately stay as you set them.
- Mix at 0% differs from bypass: Auto Gain, Guard and Out still act on that path.
- Delete did not remove automation: Live's Delete resets the value and keeps the envelope. Use Clip's context-menu Delete Automation.
Compatibility
Clip works in Live 11 and 12 with Max for Live, on macOS and Windows, at 44.1, 48 and 96 kHz. It adds no latency except the 23 samples of True Peak, which it reports to Live. Sets and device presets recall every control. Keep projects backed up before updating any device.
For help, contact ELXR support. Include the build shown in Settings, your operating system, Live and Max versions and short reproduction steps.
Need help with the guide?
Include your Clip version (Settings shows it), your operating system, Live and Max versions and the shortest steps that reproduce the problem.
ELXR support