 ELXR
Position manual
Position shows where your sound sits: left or right, wide or narrow, in phase or fighting itself, and at which frequencies. It has 23 presets, from a classic stereo scope and spectrum to an oscilloscope, spectrogram and sound design views, and it can draw up to 10 other tracks in their own colours on top of yours.
The pictures in this manual are drawn from the device's own code on a real mix.
Start in one minute
- Drop Position on a track, a group or Live's Main track, after the effects you want to see. Play some audio.
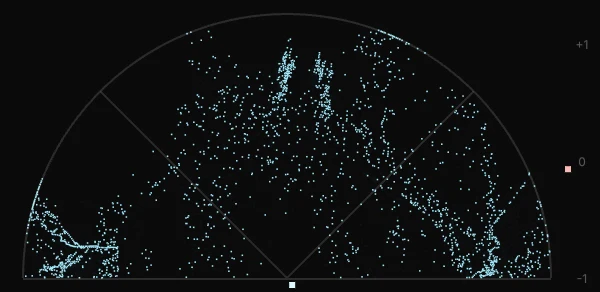
- It opens on Stereo Scope. Mono goes straight up; a wide sound fans out; anything past the two 45-degree lines is out of phase.
- Click the preset name in the middle of the controls row to pick another view, or step through them with its arrows. With the name selected, the Up and Down arrow keys step too.
- Click Sources to add other tracks, each in its own colour.
- Click the gear for Settings: General for measurements and labels, Look for appearance and the current view's controls.
The controls
Just below the picture, Zoom magnifies the view (drag right; double-click resets), with MONO on the right. The Oscilloscope puts Sync and its time slider (or Sync length) where Zoom usually sits. Below that, from left to right: the snowflake freezes the picture while audio keeps playing, the preset name and arrows, Sources, Expand (a larger window you can resize) and the gear.
With MONO and Listen off, Position passes audio through unchanged. MONO combines the channels and Listen filters the output, including recordings and exports. Turn both off before recording or exporting the original stereo mix.
---page---
Pick a view
23 presets in five folders
Click the preset name: the folders open, and hovering a folder shows its presets. The everyday views come first and the unusual ones last, so stepping through from the start shows the most useful pictures first.
Essentials
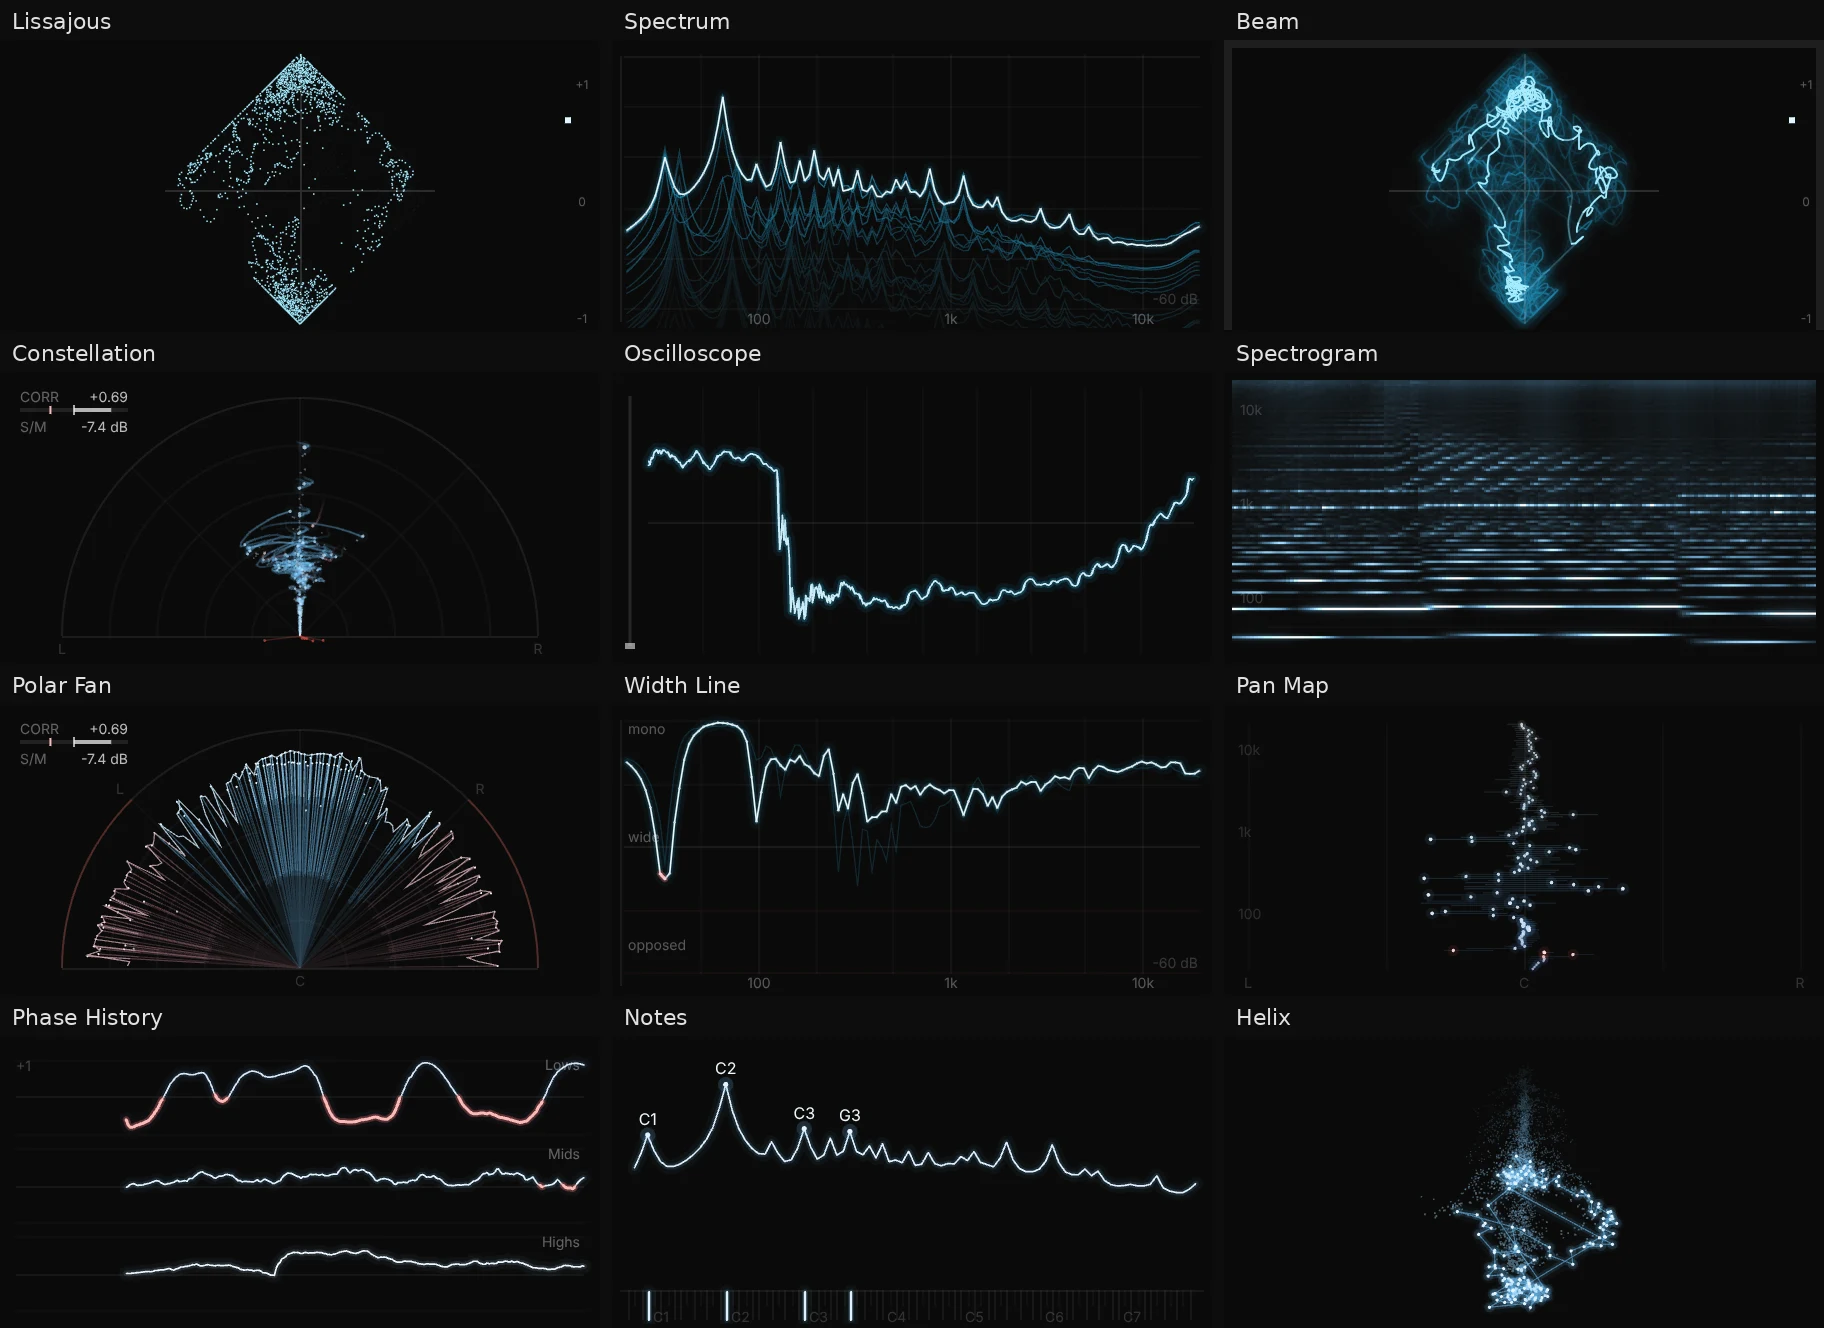
- Stereo Scope: every sample as a dot growing up from the bottom middle. Mono is straight up, wide fans out, past 45 degrees is out of phase.
- Lissajous: Mid up, Side across. A vertical line is mono, a round cloud is wide, a flat line is opposite polarity.
- Oscilloscope: the waveform, scrolling (drag its time slider from 10 ms to 2 s; it fills the height, following the loudest recent peak, and a longer time redraws from what was already heard) or locked to the song with Sync (1/16 to 4 bars, at a fixed scale so levels compare honestly). Add your kick and bass as Sources and the stretches where they push against each other are marked.
- Spectrum: the spectrum as a live line with a glowing echo of the last moments.
- Spectrogram: frequency over time, to see where a sweep or a hat sits and what a drop changes. By default every partial is a glowing line over time (Look: Trail), and Draw turns the lines into dots or the Hex look. Look: Classic gives the usual heat picture, with Colour showing level, stereo width or heat.
- Classic Spectrogram: the usual frequency-over-time heat picture, with Level, Stereo or Heat colour. It sits beside Spectrogram in Essentials.
- Beam: every sample joined into one glowing line, like an analogue oscilloscope; bright where it moves slowly.
- Constellation: every frequency band as a fine point with a comet tail: balance, width and phase of the whole mix at once.
- Filaments: a hairline from the centre to every band, bright at its tip.
Looks
- Spectrum Hex: the spectrum as columns of dots, bright on top.
- Arcs: arcs show how far each band is spread.
Checks
- Polar Fan: a hairline for every direction the samples point, bright at the tip, with a thin edge.
- Width Line: how wide each frequency is, as one glowing line. Up is mono; below the middle is out of phase, marked in the problem colour.
- Mid / Side: the centre and the sides as two lines on one spectrum.
- Pan Map: every frequency placed left to right, lows at the bottom.
- Phase History: the correlation of the lows, mids and highs over the last 10 seconds, to catch the moment a sound flips.
- Notes: the pitches in the sound, read from the audio (no MIDI needed). Trail draws each pitch you hear as a glowing line moving over the last few seconds, so a melody, a bassline or a glide reads like a piano roll; Heat shows every pitch's level over time as a heat map; Keys is the spectrum over a keyboard with the loudest notes named, for tuning a bass or a kick. Snap (off by default) puts everything on the exact notes; leave it off to see slides, vibrato and detune as they are.
- Loudness: momentary and short-term loudness against a target you pick in Settings (an estimate from the analyser, not a certified LUFS meter).
Sound Design
- Phase Portrait: the sound against itself a moment later, filling the view at a steady size. A clean tone draws a clean loop; detune makes it breathe.
For Fun
Creature, Rays, Band Scope (the Stereo Scope with white lows, mids in the Colour swatch and highs in the Accent swatch) and Helix (the Lissajous in the middle of the view, the newest moment as linked, glowing points, with Trails Low or High older moments spread outward). Helix is the last preset.
---page---
Read the stereo picture
Position, width and phase
The scopes
Stereo Scope, Polar Fan, Lissajous and Beam draw the samples themselves. In the half circle views the angle is the stereo position and the distance is the level: mono goes straight up, a sound in one channel only lies on the left or right 45-degree line, and anything beyond those lines is out of phase. Lissajous turns the same picture into a diamond: mono is a vertical line, one channel alone runs along the faint L or R line, opposite polarity lies flat.
The scopes follow your level automatically (Gain Auto), so quiet material stays readable. Samples at full scale draw red and CLIP shows; OVER means only that the picture ran past its edge with a fixed Gain.
The band views
Constellation, Filaments, Creature, Rays, Arcs and the other band views split the sound into frequency bands. Left to right is the pan position, distance from the bottom centre is level, and a wider shape means left and right differ more in that band. Colour does not mean frequency: hover a band to read its frequency, level, pan and correlation (turn on Hover info in General).
Correlation and S/M
CORR runs from -1 to +1. Near +1 the two channels are alike; around 0 they are unrelated; below 0 they push against each other. A small mark holds the lowest value of the last two seconds. S/M is the Side level against the Mid level in dB: more Side usually means wider, but it is not a width percentage or a target.
Negative correlation is a mono risk, not proof the sound disappears in mono. How much you lose depends on level and frequency. Look at which frequencies are affected, then listen in mono.
The problem colour
Out-of-phase bands, negative correlation and clashing sources are drawn in one problem colour. It is red, unless red is one of the colours on screen, in which case Position picks white, then blue, then whichever colour stands out most. You can set your own in Settings (the third colour square, Phase).
---page---
Listen, select and zoom
Look first, then listen
MONO
Click MONO below the picture on the right to hear the left and right channels averaged together in both speakers. The button lights up while on; click it again to return to stereo. The analyzer still shows the stereo input, so you can compare what you see with what survives in mono. If Listen is on, MONO combines the filtered sound.
MONO starts off when the device loads, including when you reopen a Set. Reset all also turns it off. Open menus temporarily hide the button; closing a menu reveals its current state again.
Listen
A click on a band in a band view or in the spectrum solos it: you hear only that band. Drag across the spectrum to solo a range. The headphones and frequency at the bottom left show what is soloed. Click the headphones to turn Listen off, or click the band again to clear the selection and stop filtering. MONO stays as you set it. Listen fades in and out over about 10 ms to soften the transition. The scopes always show the full input, even while you listen to one band.
Select
Drag a box around bands in a band view to select and listen to them; the rest dims and a chip names the selection. Click the headphones in the chip to clear the selection and stop filtering; MONO stays as you set it.
Zoom and move
Drag the Zoom slider to the right to look closer at any view (on the frequency views it narrows the range toward the lows, on Phase History it shows fewer seconds, on the sample views it magnifies); double-click it to reset. The mouse wheel zooms too. While zoomed, dragging moves the picture (on the Oscilloscope it moves the waveform up and down); turn on Select to drag a selection box instead. A double-click on a zoomed spectrum restores its full range. On the Oscilloscope a thin slider on the left edge of the picture zooms the waveform up and down.
Freeze, Hold and Expand
The snowflake freezes the picture while the audio keeps playing; click it again to go on. Hold (General) keeps each band's loudest position for 1, 3 or 10 seconds or for ever; double-click the picture to clear it. Expand opens a larger window that follows the device; resize it freely.
Keys
With the preset name selected, Up and Down step through presets. Space starts and stops Live's transport even after you click on Position, and Escape closes an open menu.
---page---
Sources
Up to 10 other tracks in colour
Click Sources in the controls row. The menu lists the sources you are using and a + row at the bottom; click the + to pick a track from Live's Audio From list for that input. Each new source gets the next colour: red, yellow, green, purple, orange, pink, teal, lime, magenta, raspberry. None of them is blue, the colour of your own track, and the colours are chosen to stay apart from each other. At 10 sources the + row goes away.
Each source is drawn the way your track is: as its own strands on the scopes, in the same style in the band views, as its own line or dots on the spectrum and in its colour on the Oscilloscope. A source keeps its true level, so a quieter track draws smaller. Sources are only measured, never heard. A silent source draws nothing.
To remove a source, click the x at the end of its row (or pick Off in its track list). Live saves your sources with the set.
On the Oscilloscope, add your kick and your bass: wherever the two push in opposite directions, their lines turn the problem colour, so you can see the exact stretch that fights.
---page---
Settings reference
General and Look
Click the gear. The controls row turns into the yellow ELXR button, General, the preset switcher (so you can flip presets with a card open), Look, and a Reset all button (the circular arrow) beside the gear. Three small colour squares appear above the gear: the picture's Colour, the Accent and the Phase (problem) colour. Click a square for the colour picker (it reaches deep, vivid colours; the colour you pick is drawn as it is); the small x beside a changed square restores its default. Click a tab to open its card at the right, beside the colour squares. The card is small so the picture stays in view: its settings are a row of tabs (for example Draw, Clean, Light and Trails), and only the open tab's choices show underneath. Related controls such as Bright and Glow share the Light tab. Each card remembers which setting you had open. Click the tab again, the gear, or anywhere outside to close. Point at a choice to preview it on the picture before you click. Reset all restores every default in one click.
General
Four tabs. Measure holds Res (resolution) Low, Med or High (1/3, 1/6 or 1/12 octave). Speed Fast, Mid or Slow, Range 36, 48, 60 or 72 dB and Hold Off, 1 s, 3 s, 10 s or ∞. Freq Full, Low, Mid or High. Grid Off, Faint or On. Text holds the words on the picture: Hover shows frequency, level, pan and correlation under the mouse. Hints explains each control when you hover it, Info shows the readouts and labels, and Warn (Off, Loose or Strict) adds a short notice when the lows lose correlation, the mix goes negative or one side is louder.
---page---
Settings reference
Look
The Look card lists only the settings that change the view on show, a few tabs at a time: Light groups the available Bright, Glow, Hue and Shade controls. The view's own settings, such as Gain or Size and Rear, have tabs in the same row. Style depends on the view: the spectrum is drawn as Bars, Line, Electric or Hex; the scopes get Clean (Off to High, which smooths away scattered edge dots); the band views get Dots (dot size). Draw (Lines, Dots or Hex) works the same on every view, the Spectrogram and Polar Fan included, and stays as you set it when you change presets. Lines and Dots are just that; Hex is the Helix preset's look on any view: a fine line with small bright points on it (on Stereo Scope and Lissajous only a hint of the dot cloud stays under it, more with Trails on). Until you pick one, each preset shows its own look. Then Bright (Off by default, Low or High: lights only the newest, strongest part of the picture toward white; everything else keeps your colour exactly), Glow (Off, Low, Mid, High: it widens the soft halo every line carries), Trails (Off, Short, Mid, Long on the scopes and the Electric spectrum; Off, Low or High on the Oscilloscope, Helix and the line views, where it is off by default; Off or On on the band views) and Hue (the colour slowly turns round the wheel). Shade shades the colour by frequency on the spectrum and band views. Glow and Trails stay as you set them when you change presets, until Reset all.
The view's own settings follow at the end of the Look card (a view's own Style, on the Spectrogram and Notes, comes first):
- Scopes: Gain (-12 to +24 dB or Auto: how big the picture is drawn).
- Band views: Size (Fixed or Auto), Rear (out-of-phase marks below the base line).
- Oscilloscope: Sync and Channel (Mid, L, R or Side). Phase Portrait: Channel. Spectrogram: Style (Trail or Classic) and, for Classic, Colour (Level, Stereo or Heat). Notes: Style (Trail, Heat, Keys), Snap and Names (off by default). Loudness: Target (-23 to -8).
- Spectrum: Mode (RMS, Peak or Width), Chan (L+R or L/R), Marks (Off, Peaks, Max or Both), Tilt (0, 1.5 or 3 dB per octave, or A / C weighting).
ELXR
The yellow ELXR button opens elxr.net, Manual, Feature request and Report a bug.
---page---
Use it in a mix
Quick checks and help
Is my bass centred?
Pick Pan Map or Constellation and look at the lowest bands: they should sit in the middle. Width Line shows the same as a line; the lows should stay at the top.
Do my kick and bass clash?
Add the kick and the bass tracks as Sources and pick Oscilloscope, then turn on Sync with 1 bar. The stretches where they push against each other are marked in the problem colour.
Is my synth too wide for mono?
Use Stereo Scope or Lissajous while you change the detune or the chorus. If the cloud spreads past the 45-degree lines, check Phase History for the moment it flips. Click MONO to compare the sound in mono, then click it again to return to stereo.
If something looks wrong
- The picture stands still: the snowflake is on, or no audio reaches Position.
- The audio sounds thin or narrow: check MONO and Listen. Turn MONO off and clear Listen with the headphones at the bottom left, or click the selected band again.
- A band turns the problem colour: look at its frequency and listen in mono. It is a warning, not proof the sound cancels.
- The scope runs off the edge: set Gain to Auto in Look.
- Dragging moves the picture instead of selecting: turn on Select, or reset the zoom.
- A source is missing: check its track in the Sources menu; a silent source draws nothing.
Support
For help, write to ELXR support with your Position, Live and operating system versions and the steps that show the problem.
Install
Drop Position.amxd on any track after the sound you want to see, or save it into your User Library (Presets / Audio Effects / Max Audio Effect). Needs Ableton Live 12 with Max for Live. Questions: [email protected].