 ELXR
Polyrhythm manual
Written for version 1.2.
Each ball follows a shape. Corners and trigger crossings play notes; different speeds let the balls drift apart and meet again. Choose a ready-made Type, change the shape or notes, then add Feel or a longer musical Phrase.
Polyrhythm makes MIDI: put an instrument or a Drum Rack after it. Click the number under a dial to type a value.

Hear your first pattern
- Put Polyrhythm before an instrument on a MIDI track. A synthesizer or Drum Rack after it turns its MIDI notes into sound.
- Start Live's transport. Begin with Pendulum Wave, or choose 3 : 2 from the Type strip for an easier rhythm to follow.
- On Main, adjust Cycle to change how long the complete pattern takes. Fewer bars means faster movement.
- Choose a Scale and Root for a pitched instrument. For Drum Rack, choose the Drums scale and load pads from C1 upward.
- Listen before adding more balls. On Feel, lower Probability for gaps or raise Swing a little. On Music, try a 4-bar Phrase for a longer shape.
Where to go next
Choose a Type, Main, Shape, Feel, Music, Copy MIDI, Map, drawing and the larger view, then starting points and troubleshooting.
Control basics: drag a dial vertically; hold Shift for fine movement; double-click to return it to its default. Click an option dial without dragging to step to its next choice. To type an exact value, click the number under a dial, type it and press Enter; Escape cancels. Values outside a control's range are clamped, and whole-number controls such as Balls and Cycle round to the nearest step.
Choose a Type
A musical starting point, not a restriction
The Type strip above the page tabs contains 23 starting patterns. Click its left or right half to step backward or forward, or drag vertically through the choices. A star beside the Type indicates that rhythm settings differ from that Type's starting values.
Changing Type resets the rhythm's shape, speeds, ball count, Cycle and related geometry. Scale and Root remain your choices. A Type change also clears custom trigger lines, so save your work before exploring a different starting point.
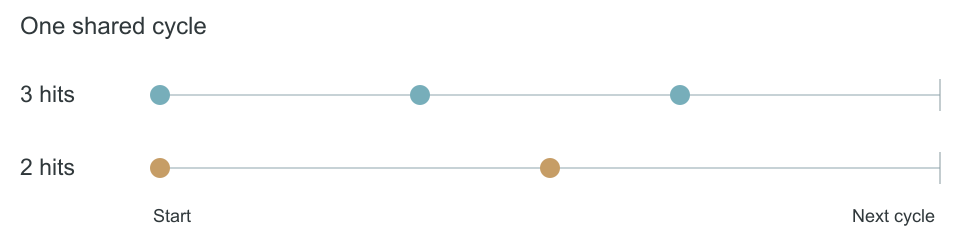
The 23 Types
- Wave and simple ratios: Pendulum Wave; 3 : 2; 4 : 3; 7 : 4; 5 : 4 : 3.
- Stacks and related cycles: 1 : 2 : 3 : 4 Stack; 12 : 6 : 4 : 3 : 2 : 1; 3 : 4 : 5 : 6 Polygons; 3 / 4 / 5 Polymeter; 2 : 3 : 5 : 7 Primes; 1 : 2 : 3 : 5 : 8 Spiral.
- Phase and interlocking patterns: 12 : 13 Phase; Clapping Music; Tresillo 3 in 8; Son Clave 3-2; Bell 7 in 12; Aksak 2+2+3; Interlock 3 x 3 in 8.
- Movement-led patterns: Half Circles; Bouncing Balls; Gravity Squares; Swinging Lines; Bounce Box.
Dice and Mutate
The dice makes a new combination of rhythm settings. It can change Scale, so check the result before playing it against a fixed harmony. Root is retained. The generator tries to keep the result playable, but the receiving instrument and Feel settings also shape what you hear.
The alien icon is Mutate. It returns to the current Type's baseline and makes two small setting changes. Repeated clicks explore that Type rather than steadily piling changes onto your edited pattern. Save a custom result before using either button.
Try it: use 3 : 2 with a short, clear pluck. Once you can follow both pulses, change to 4 : 3 without changing Scale or Root.
Main: voices and notes
Give the rhythm a useful pitch range
The Main page holds Balls, Speeds, Cycle, Offset, Mode, Range, Scale and Root. Some controls hide when they cannot change the current result. The others close up to fill the space; their position can therefore change.
Balls, Speeds and Cycle
Balls sets the number of voices, from 1 to 25. More voices can make a rich texture; a small number makes the rhythm easier to hear. Every ball rides its own copy of the path.
Speeds chooses how their laps relate: Wave, Harmonic, Odd, Primes, Fibonacci or Ratio. Ratio uses the list belonging to the Type. Wave makes each voice one lap faster than the last; Harmonic uses 1, 2, 3, 4 and onward. Odd, Primes and Fibonacci use their corresponding number sequences.
Cycle is the shared pattern length, rounded to whole bars from 1 to 128. Offset rotates each successive ball's starting position to make the notes ripple. It appears only when the change affects the rhythm. Physics motion behaves differently; see Shape.
Ball or Position
Mode: Ball gives each ball its own note, climbing through the chosen scale. Position takes pitch from where a hit occurs around the shape, allowing the path to make a melody. Mode hides when both choices would sound the same.
Range limits the octave span (1 to 6 octaves); notes above that span wrap back into the available range. Root sets the starting pitch and Scale supplies the note collection. There are 14 pitched scale choices, plus Drums.
Chords from MIDI input
Hold notes on a keyboard, or play a chord clip into Polyrhythm on this track, to supply the note collection instead of the selected scale. Releasing the held notes returns to the scale. Use longer held chords when you want a phrase to keep the same harmony.
Drum Rack
Choose Drums in Scale. Ball 1 plays C1, ball 2 C#1, ball 3 D1 and so on. Root hides in this mode. Load samples into those pads and choose the ball count to suit the kit. A silent pad makes its ball inaudible even when the geometry is moving.
Shape: the path becomes rhythm
Change what happens during each lap
Shape offers Circle, Line, Triangle, Square, Pentagon, Hexagon, 7 Sides, Octagon, 9 Sides, 10 Sides, 11 Sides, 12 Sides and Drawn. Drawn becomes available after you draw a path.
For the standard shapes, Circle gives one note per lap, Line two, Triangle three, Square four and so on. Custom trigger lines can add crossings on top. The picture helps explain the timing; the resulting rhythm also depends on motion and each ball's speed.
Spacing, Steps and Nested
Even spreads the shape's corners evenly around a lap. Euclid distributes those events over a grid of Steps, producing patterns such as three events in eight positions. Steps appears with Euclid; choices that produce no new groove are skipped.
Nested gives successive balls more corners: triangle, square, pentagon and onward. It turns the shape count itself into a rhythmic relationship. Controls appear only when the current shape and ball count make them useful.
Motion
- Even: travel steadily around the shape.
- Swing: move back and forth with a pendulum-like change of speed. This is a motion choice, separate from the Feel page's Swing amount.
- Gravity: move faster near the top and slower near the bottom.
- Bounce: travel out and back, making a different relationship between travel and turns.
- Physics: balls move and bounce inside the shape, including interactions with its walls and drawn triggers. Treat this as an evolving performance rather than a fixed repeating Cycle.
Physics controls
Physics reveals Gravity, Bounce and Quantize. Gravity controls how strongly the balls fall. Bounce controls how much speed a wall hit retains. Quantize pulls free hits toward the next sixteenth-note position.
In Physics, Cycle, Speeds, Feel Swing/Humanize/Ratchet and the Phrase/Accent controls are hidden. They are not another layer of settings to adjust underneath the physics performance.
Try it: compare an Even square with Gravity Squares. Keep the receiving sound short so the timing differences remain clear.
Feel: turn events into a groove
Dynamics, length, gaps and repeats
The Feel page changes how the rhythm is played. Start with modest amounts and adjust one control at a time.
Level and length
Velocity sets note strength from 1 to 127. Inner voices play a little softer; the moment voices meet receives an accent. Your instrument must respond to velocity for all of that difference to be audible.
Gate sets note length as a percentage of the time until that voice's next hit. At 100% it reads Legato. A shorter gate suits precise plucks; a longer one lets pitched notes overlap musically with other voices.
Impact makes faster movement strike harder. It changes velocity, rather than creating a separate sound or effect.
Gaps and timing
Probability is the chance that a hit plays. At 100%, eligible hits play; lower settings leave gaps. Swing delays every second sixteenth-note position. Humanize introduces small timing and velocity changes; its timing variation can be up to 25 ms.
Ratchet is the chance of turning a hit into a short repeat of two to four notes, spaced at thirty-second-note intervals. It is separate from the Music page's phrase-ending Fill. Use a short receiving sound at first: long releases can hide the repeated attacks.
With Phrase Off, Probability, Humanize and Ratchet can produce different results on successive passes. Do not assume every loop will match note for note. Phrase-on variations use song position, but Physics remains a separate evolving mode. If you need the exact performance you just heard, capture it with Copy MIDI.
Start
Start sets the song bar from which the pattern is anchored, from bar 1 to 128. Use it to place a pattern relative to the arrangement rather than treating every press of Play as a new free-running start.
Try it: use a two-ball Type at Probability 100%, Humanize 0% and Ratchet 0%. Add a little Swing, then lower Probability. This makes each source of change easier to hear.
Music: shape a longer phrase
Keep the groove, vary the journey
On Music, set Phrase to Off, 2, 4, 8 or 16 bars. With Phrase Off, the plain rhythm loop plays. With Phrase on, the phrase shaping returns to its starting groove on bar 1. The dashes below the geometric view indicate phrase progress.
Four styles
- Build: begin with the groove, thin it, then build back toward the end.
- Breathe: leave a thinner section around the middle.
- Answer: let slower balls lead, then let the faster balls answer.
- Drop: shape a rest in the last bar before returning to the groove.
Variation controls how strongly the style moves away from the underlying groove. Start around the middle, then reduce it if the phrase loses too much of the original pulse. At 0%, phrase thinning leaves the underlying groove intact; Fill, Accent and Feel remain their own controls.
Fill and Accent
Fill adds activity near the end of a phrase, concentrated on the busiest ball. It adds at most one extra note per eligible hit from that ball. At 0%, this phrase fill is off. It does not turn every ball into a fill, and it does not replace the independent Ratchet control.
Accent makes strong beats louder and off-beats softer. It works with Phrase Off too. Style, Variation and Fill appear only when Phrase is enabled; Phrase and Accent are not offered in Physics motion.
Repeatable structure, captured performance
Phrase-on Feel decisions are derived from musical position. That helps a loop retain its structure at the same settings. Changes of Type, transport position, chord input or parameters can change the outcome. Copy MIDI records the notes actually emitted, so it is the useful way to keep a particular performance for editing.
Try it: choose Tresillo 3 in 8, then Phrase 4 bars and Build. Add Variation gradually, then a small Fill. Listen for a return at the next phrase start before adding other changes.
Next: Music also contains Copy MIDI and its small arrow. Play a phrase first; these controls work from recent captured notes, not from a predicted future pattern.
Keep the MIDI you just heard
Copy recent playback into editable Live clips
Copy MIDI on Music uses a temporary rolling capture of the actual emitted notes, including Feel and Phrase. It retains up to one current Phrase, or one Cycle when Phrase is off. It is not a render of a pattern you have not played.
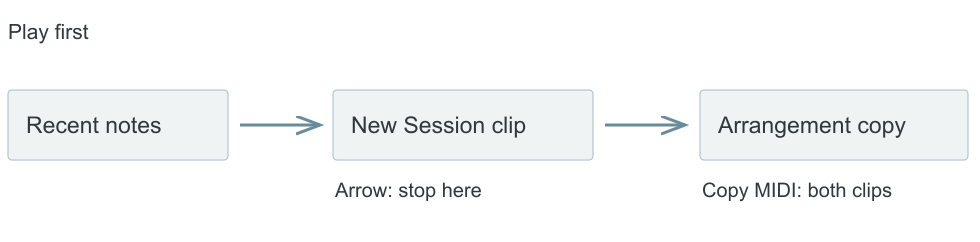
Copy to Arrangement
- Let the device play long enough to collect the performance you want. Stop if you want to keep that exact captured ending.
- Place the Arrangement playhead where the copied performance should begin.
- Press Copy MIDI. It creates a new MIDI track named Polyrhythm MIDI, writes a Session clip named Polyrhythm capture, and copies it into Arrangement at the current playhead.
- Put an instrument on the new track, or move the clip to a suitable instrument track, to hear and edit it as ordinary MIDI.
Existing clips are not overwritten. The new track keeps the exported performance from being sent back through Polyrhythm and generated again.
The arrow: a Session clip for dragging
The adjacent small arrow creates the new track and Session clip without the Arrangement copy. Live opens Session view and selects the clip. Use Live's normal clip dragging to move it where you need it. This is a Live clip workflow, not an operating-system clipboard or a MIDI-file download.
Capture is temporary
The capture clears on the next playback start or device reload. Export before restarting if you want to keep the last pass. If it says Play MIDI first, play some notes through the generator first. Capture full means the temporary note limit was reached; stop and play again to collect a new pass.
The capture follows message timing rather than being a sample-accurate offline renderer. For critical edits, inspect the resulting clip against the sound and song grid.
Map: let a ball move a parameter
Up to sixteen rows of continuous control
On Map, each row follows a selected ball's X or Y position. X is horizontal movement; Y is vertical. Rows can drive a Live parameter, a MIDI CC, or both. Several rows can follow the same ball.

Assign a Live parameter
- Choose the ball by clicking its number or dragging it vertically. Click X/Y to change the axis.
- Click that row's Map button. While it flashes, click the destination knob in Live. Choose a parameter on another device; Polyrhythm's own parameters are excluded.
- Drag Max (top) and Min (bottom) vertically to choose the part of the target's range you want. Min above Max reverses the movement. Double-click Max for 100% or Min for 0%.
- To release an assignment, click its filled Map button; on hover it shows an x. Click a flashing Map button again to cancel an unfinished assignment.
+ Add a ball adds a mapping row, not another sound-generating ball. - Remove removes the last row. There can be up to 16 rows; scroll when more than four are present. Set the actual voice count with Balls on Main.
MIDI CC
Shift-click Map to switch that row's button to its CC control. Drag the CC number vertically. CC 1-127 sends that controller; 0 means off. Double-click it to turn CC off; Shift-click again to return to the Map button. Range limits apply to CC movement too. Route the device's MIDI output to a receiver that uses that CC.
If a row is not moving
The selected ball must exist in the current pattern. A row can display Ball unavailable after reducing Balls; choose an active ball or restore the count. A small inner path may use only part of a parameter's range.
If you delete the mapped device or track, the row lets go of it safely and stops sending; Undo does not reconnect it. Click Map and choose the target again. Save a copy of the Set before reorganizing mapped devices.
Draw and open a larger view
Add your own paths and trigger lines
Click the small pencil in the geometric display to enter drawing mode. Click it again to finish. The same drawing tools are available in the larger view.
Triggers, Path, Free and Clear
Triggers adds lines that sound when a ball crosses them, on top of the selected pattern. Drag a stroke to create a trigger. Use the drawing tools to work on your own lines: drag a line body to move it, or a straight line's endpoint to change it. Up to 16 custom trigger lines can be added.
Path replaces the ball path with your drawn shape. Draw a complete stroke; the device closes and resamples it. After a valid path is made, Shape changes to Drawn and the tool returns to Triggers. Drawn is skipped in the Shape dial until a path exists.
Free switches between grid drawing and freehand interpretation. The eraser removes a nearby custom trigger, or your drawn path. Double-clicking your path while Path is selected also removes it. Clear removes custom trigger lines and the drawn path; it does not erase the factory Type list.
Drawing edits connect to Live's Undo/Redo through drawing history. Use Cmd+Z / Cmd+Shift+Z on Mac, or Ctrl+Z / Ctrl+Shift+Z on Windows. Test a simple edit in a copy of your Set before relying on a complex drawing history.
Expand, minimize and video
Expand opens a resizable larger geometric display. Its fullscreen icon toggles fullscreen; Esc exits fullscreen when keyboard focus reaches the device. Close the larger window to return to the compact view. The small collapse arrow hides or shows the settings beside the geometry.
The larger view also has a record dot that opens a file-save dialog for recording the visual display. Click the record control again to stop. This is display video recording, separate from Copy MIDI; use Live to record the sound. Make a short test recording before relying on it for a final take.
Pages
The page tabs are Main, Shape, Feel, Map, Music. They hold all the device settings. The MIDI timeline and arpeggiator belong to the VST/AU plugin, not this Max for Live device.
Starting points and troubleshooting
Make one change, hear what it does
A clear cross-rhythm. Choose 3 : 2 with a short pluck. Keep Probability at 100%, Humanize and Ratchet at 0%. Change Cycle until both pulses are easy to follow, then compare 4 : 3.
A moving drum groove. Load Drum Rack pads from C1 upward, choose Drums, then Tresillo 3 in 8 or Interlock 3 x 3 in 8. Add a little Probability variation only after every active ball has a sound.
A phrase to edit. Choose a pitched Type, hold a chord, and try a four-bar Breathe or Answer phrase. Play the full phrase, stop, then Copy MIDI before restarting. Edit the resulting notes on a new instrument track.
No sound
Polyrhythm makes MIDI, not audio. Check that an enabled instrument follows it, Live's transport is running, Probability is above zero and the chosen pitches reach audible sounds. In Drums, check the matching pads. Check track monitoring and mute states in Live.
If the Type strip says Engine unavailable - notes stopped, the device has stopped its notes rather than substituting another rhythm. Check Live's audio engine/settings and report the warning if it persists. Do not solve it by adding a second instance and assuming the first is repaired.
Different notes on the next pass
Phrase Off permits true random Probability/Humanize/Ratchet variation, and Physics is an evolving performance. Dice creates a new pattern and can change Scale. Incoming chords override the scale. For a specific performance, use Copy MIDI before the next playback start clears its temporary capture.
Controls disappear, or Map looks wrong
Controls that do not affect the current shape or motion hide automatically. In particular, Physics swaps several timing controls for Gravity/Bounce/Quantize. Map's Add a ball adds a row, not a voice. After a mapped device is deleted, click Map and assign the row again.
LFOs, modulators and automation
Every value knob (Cycle, Offset, Range, Swing, Probability, Gate and the rest) can be automated in Live or mapped to an LFO or modulator: click Map on the LFO, then click the knob. Selector controls such as Speeds, Shape and Motion (Bounce and the other choices) switch modes and change what other knobs do, so set them by hand rather than modulate them.
Keep a safe working copy
Save distinctive drawings, mappings and automation in a copy of your Set, then save and reopen it before important work.
For help, visit elxr.net/support or use Report a bug. Include your operating system, Live version and the shortest steps that reproduce the problem. Ideas are welcome through Request a feature.
Install
Drop Polyrhythm.amxd on a MIDI track before an instrument, or save it into your User Library (Presets / MIDI Effects / Max MIDI Effect). Needs Ableton Live with Max for Live, on Mac or Windows. Questions: [email protected].