 ELXR
Transient manual
Written for version t21m.
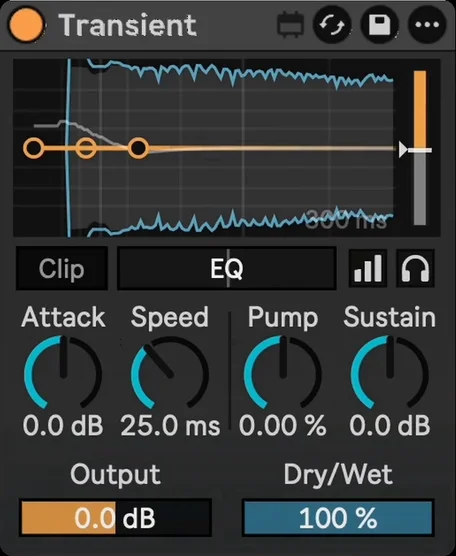
Transient makes drums punchier or softer, tightens tails or brings out the room. Shape detected hits with a Sampler-style envelope, and compare captured input and shaped waveforms on the display.
Click a numeric control and type a value. Hold Shift before starting a fine drag and keep it held until you release the mouse. Double-click a control to reset it.
Quick start
- Drop Transient on a drum track or a drum bus.
- Turn Attack up for punchier hits, or down to soften them.
- Turn Sustain down to tighten the tails, or up for more room and ring.
- Use Speed to make the punch clicky (short) or fat (long).
- Turn on Clip if boosted hits go over 0 dB.
- Compare at a similar listening level. Turn Listen off before judging the full result or exporting.
The display and the envelope
- With the default colours, grey shows captured input and blue shows the shaped signal including Auto Gain. The blue trace is taken before Dry/Wet, Listen, Output and Clip, so it is not the final output meter. Use Live's track meter to check the level leaving the device.
- The coloured envelope shows the Attack, Speed, Pump and Sustain settings. The horizontal centre line is 0 dB of shaping; the moving white dot follows the shaping gain. There is no separate thin applied-gain trace.
- Drag the first handle vertically for Attack, the bend for Pump, and the corner horizontally for Speed or vertically for Sustain. The corner controls two settings: double-clicking it resets both Speed and Sustain. You can also use their dials.
- A capture can contain several hits; small ticks mark later hits within it. Busy loops do not restart the entire display on every hit. Changing Speed also adjusts the visible time span.
- The meter at the right edge flashes on every detected hit. Its white line is the Sensitivity: drag it down to catch more hits, up to catch only the big ones.
Controls
| Control | What it does |
|---|---|
| Attack | Louder (+) or softer (-) hits, -24 to +24 dB. This is the gain right at the start of each hit. |
| Speed | How long the Attack part lasts, 1 to 500 ms. Short is clicky and snappy; long is a thick, fat punch. |
| Pump | The shape of the drop from Attack to Sustain. Up drops fast (spiky, pumping); down holds the Attack, then drops (fatter). 0 is even. |
| Sustain | Louder (+) or quieter (-) body and tail after the hit, -24 to +24 dB. Down is tighter and drier; up is more room and ring. |
| Output | Level after the Dry/Wet mix or Listen signal, before Clip; -24 to +24 dB. With Clip on, increasing Output drives the clipper harder. |
| Dry/Wet | Balance between the time-aligned original and the shaped sound. Output and Clip still act on the result at 0% wet. Listen overrides this balance while auditioning the difference. |
Choosing which hits react
- EQ filters the signal used for hit detection, without applying that filter to the audio you hear. Drag left to favour frequencies below the displayed value: "EQ < 150 Hz" helps the detector follow kicks instead of hats. Drag right to favour frequencies above it: "EQ > 3 kHz" helps it follow bright attacks instead of bass. These are gradual filters, so unwanted hits may still need a Sensitivity adjustment. The centre (just "EQ") uses the full range. Hold Shift throughout a fine drag; double-click returns to the centre.
- Sensitivity (0 to 100 %) sets how easily a hit is detected. Higher catches softer hits and ghost notes; lower reacts only to the big hits. Set it with the white line on the meter.
Clip, Auto Gain and Listen
- Clip: a 4x oversampled soft clipper followed by a safety stage, after Output. Once fully engaged, it limits sample peaks to 0 dBFS. It fades when switched, so enable it before a loud passage. With Clip off, the bottom-left bar marks overs in red; with Clip on, it shows clipping reduction in the accent colour. Lower Output for less clipping.
- Auto Gain (the levels icon, on by default): gradually matches the shaped signal's average, frequency-weighted level to the input, before Dry/Wet and Output. It helps level comparisons but does not make every hit equally loud or hold the final output at a fixed level. Allow it to settle after changing the shaping, then compare by ear.
- Listen (the headphones): auditions the shaped signal minus the original, including any Auto Gain adjustment. Dry/Wet is bypassed for this audition; Output and Clip still apply. Turn Listen off to hear the full result.
Settings and saving
Hover over the display and a small gear appears at its top right. It opens Settings: the yellow ELXR button links to the website, this manual, feature requests and bug reports. Four colour rows change Curve, Output, Knobs and Accents. Here, Output means the blue waveform colour, not the Output level control.
Click a swatch to pick a colour, the small x beside it to restore that colour, or Reset all settings to restore all four colours. This reset changes appearance only; it does not reset the sound controls. Click the gear again or the card's top-right x to close it.
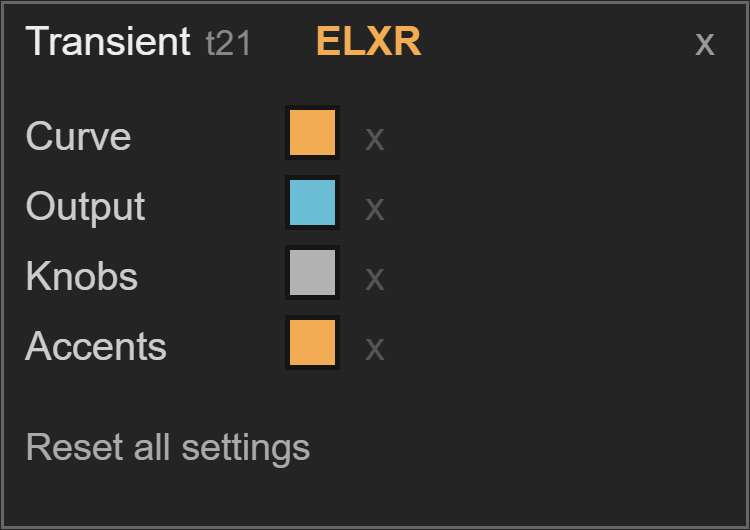
Settings rendered offline from the released device code, with approximate fonts.
Save a Live device preset for a useful starting point, or save your set to retain the controls and colours. Check Listen before saving or exporting so the next playback uses the intended full mix.
Good to know
- Transient reports 256 samples of total latency to Live (about 5.8 ms at 44.1 kHz). This includes 193 samples of lookahead and 63 samples for the clipper path. The total stays the same with Clip off, allowing Live's delay compensation to align playback.
- Hit detection is ripple-free and has automatic low-end protection.
Install
Drop Transient.amxd on an audio track, or save it into your User Library (Presets / Audio Effects / Max Audio Effect). Needs Ableton Live with Max for Live, on Mac or Windows. Questions: [email protected].